Customer Settings, PDF Settings & Tax Class Settings
Customer Settings
Navigation:
PDF Settings
Note: This will be used for all generated PDFs unless overridden.
Tax Class Settings
Navigation:
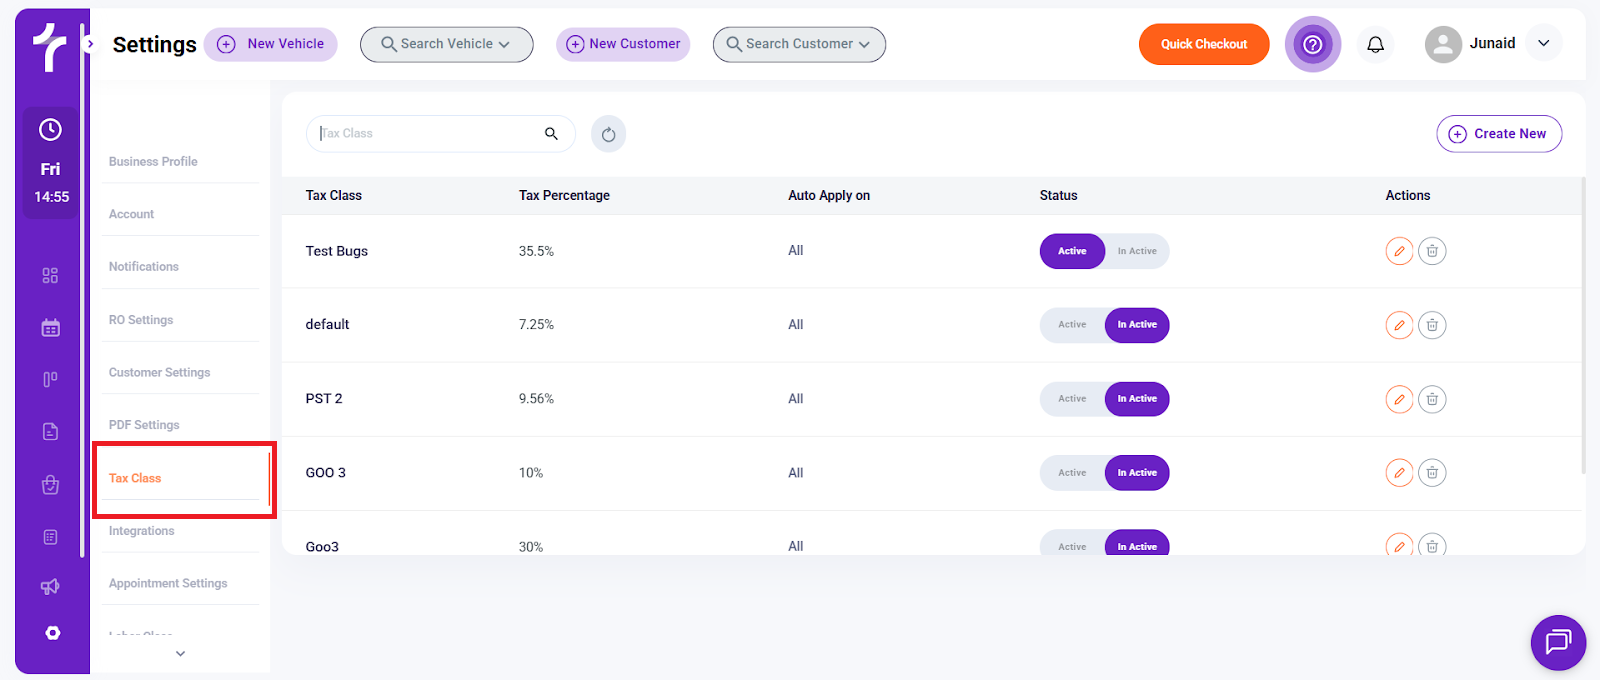
Side Panel → Settings → Tax Class
Tax Class settings allow you to define how taxes are calculated and applied to parts, labor, or both within Torque360.
View Existing Tax Classes
Navigation:
Side Panel → Settings → Tax Class
Tax Class settings allow you to define how taxes are calculated and applied to parts, labor, or both within Torque360.
View Existing Tax Classes
On the Tax Class screen, you can see a list of all configured tax classes, including:
Tax Class Name
Tax Percentage
Auto Apply On
Status (Active / Inactive)
Actions (Edit / Delete)
From this screen, you can:
Search for a tax class
Edit an existing tax class
Activate or deactivate a tax class
Delete a tax class
Create a New Tax Class
Click Create New in the top-right corner of the Tax Class page.
In the New Tax Class window, enter the following details:
Tax Class Name
Tax Class Percentage
Auto Applied On (All, Parts & Supplies, Labor)
Status (Active / Inactive)
Click Save to create the tax class, or Cancel to discard changes.
Tax Classes ensure accurate tax calculations across repair orders, invoices, and estimates. Configuring them correctly helps:
Maintain compliance with local tax regulations
Prevent billing errors
Apply taxes consistently based on your shop’s pricing structure
FAQs
What is a Tax Class used for in Torque360?
A Tax Class defines how tax is calculated and applied to parts, labor, or both. Once configured, tax classes ensure taxes are applied consistently across repair orders, estimates, and invoices based on your shop’s pricing and local tax rules.
Can I create multiple tax classes for different tax rules?
Yes. You can create multiple tax classes to handle different tax percentages or application rules (for example, one tax for parts and another for labor). Each tax class can be activated or deactivated as needed.
What happens if I deactivate or delete a tax class?
Deactivating a tax class prevents it from being applied to new repair orders, but does not remove it from existing records. Deleting a tax class permanently removes it from the system and should only be done if it’s no longer required. Always review active repair orders before deleting a tax class.
A Tax Class defines how tax is calculated and applied to parts, labor, or both. Once configured, tax classes ensure taxes are applied consistently across repair orders, estimates, and invoices based on your shop’s pricing and local tax rules.
Yes. You can create multiple tax classes to handle different tax percentages or application rules (for example, one tax for parts and another for labor). Each tax class can be activated or deactivated as needed.
Deactivating a tax class prevents it from being applied to new repair orders, but does not remove it from existing records. Deleting a tax class permanently removes it from the system and should only be done if it’s no longer required. Always review active repair orders before deleting a tax class.
Related Articles
User Settings
Navigation: Side Panel → Settings → Users User Settings allow you to add, manage, and control access for employees using Torque360. From here, you can create users, assign roles, define permissions, set wage rates, and manage shift and activity ...Labor Class & Pricing Matrix
Set Up a Labor Class Navigation: Dashboard → Settings → Labor Class. Labor Classes allow you to define different labor rates for your shop. These rates are applied when creating estimates, repair orders, and invoices, ensuring accurate and consistent ...Invoice, Estimator & Inspection Editors
Set Up Invoice Templates Navigation: Dashboard → Settings → Invoice Editor The Invoice Editor allows you to customize invoice templates that control what information appears on customer invoices after work is completed. This helps ensure invoices are ...Set Up Your Business Profile
Navigation: Side Panel → Settings → Business Profile From the dashboard, click the arrow icon at the top-left to expand the side menu. Scroll to the bottom of the menu and click Settings. You’ll land on the Business Profile page by default. Click ...Terms & Conditions
Navigation: Side Panel → Settings → Terms & Conditions The Terms & Conditions section allows you to create, manage, and customize legal and authorization text that appears across different customer-facing documents and workflows in Torque360. These ...